PART NUMBERS: (from the small hub to the last snap ring)
96152-00500 snap ring list 2.89 cost 2.21
90903-63001 t/o bearing list 71.02 cost 54.23 (Must replace with each install)
90560-50001 snap ring list 6.37 cost 4.86
90560-79001 spacer list 2.57 cost 1.97
90206-12006 wave washer list 1.71 cost 1.31
90520-75001 snap ring list 3.26 cost 2.49
31264-14060 spring list 3.26 cost 2.49
31231-14050 hub list 36.72 cost 28.04
__________________________________________________ ____
Other parts: (if you dont have them already)
90363-12002-77 pilot bearing list 10.34 cost 7.90 (must replace with each install)
31204-14060 fork list 70.65 cost 53.94 (comes with the 31204A, B & C)
90910-02115 flywheel bolts list 10.55 cost 8.05 ea x 8
90119-08079 clutch cover bolts list .54 cost .42 ea x 6
31210-14170-84 clutch cover (AKA Pressure Plate) list 159.36 cost 128.44 (if your using or replacing stock clutch, If aftermarket - look into replacing the pads)
13450-0W011 flywheel list 660.53 cost 504.32 (if your using or replacing stock, Its recommended to replace an OEM clutch instead of resurfacing it)
31250-14190 clutch disc list 85.85 cost 65.54 (if your using or replacing stock, If aftermarket - look into replacing the pads)
Ok there are the part numbers .. now if you never did a clutch before and/or you just got your new/rebuilt V160 without the clutch parts already you are probably like yeah well what the hell am I supposed to do with all this crap and how exactly do you put it all in? I searched and searched and never found anything that helped .. just diagrams like that posted above but it never made sense until I asked people I knew. With that I have used these diagrams to illustrate step by step how to install a single disc clutch in our V160's.
You can also go with aftermarket clutch kits (pressure plate, clutch disc and sometimes a throwout bearing with other rings). I have heard great things about South Bend Clutches for the street cars, RPS carbon/carbon or RPS triple carbon clutch for racing and then the Tilton multi-disc clutch as well. I have heard some horrible things and saw some pictures about the RPS carbon/carbon clutches such as the discs breaking and pretty much severing the transmission in half and almost someones leg. That could have just been a single faulty disc, but do some research before pulling the trigger on a certain clutch.
I am aware that there are two different methods of installing the clutch. One is easy and the other makes things difficult. Ill start with the easy method. This involves us having the trans out/off the engine and using a clutch alignment tool to bolt things up and then slide the trans on.

Torque specs:
The trans is out of the car wth the slave cylinder off the trans.
Lets get started:
The hard way would be to:
NOTES:
96152-00500 snap ring list 2.89 cost 2.21
90903-63001 t/o bearing list 71.02 cost 54.23 (Must replace with each install)
90560-50001 snap ring list 6.37 cost 4.86
90560-79001 spacer list 2.57 cost 1.97
90206-12006 wave washer list 1.71 cost 1.31
90520-75001 snap ring list 3.26 cost 2.49
31264-14060 spring list 3.26 cost 2.49
31231-14050 hub list 36.72 cost 28.04
__________________________________________________ ____
Other parts: (if you dont have them already)
90363-12002-77 pilot bearing list 10.34 cost 7.90 (must replace with each install)
31204-14060 fork list 70.65 cost 53.94 (comes with the 31204A, B & C)
90910-02115 flywheel bolts list 10.55 cost 8.05 ea x 8
90119-08079 clutch cover bolts list .54 cost .42 ea x 6
31210-14170-84 clutch cover (AKA Pressure Plate) list 159.36 cost 128.44 (if your using or replacing stock clutch, If aftermarket - look into replacing the pads)
13450-0W011 flywheel list 660.53 cost 504.32 (if your using or replacing stock, Its recommended to replace an OEM clutch instead of resurfacing it)
31250-14190 clutch disc list 85.85 cost 65.54 (if your using or replacing stock, If aftermarket - look into replacing the pads)
Ok there are the part numbers .. now if you never did a clutch before and/or you just got your new/rebuilt V160 without the clutch parts already you are probably like yeah well what the hell am I supposed to do with all this crap and how exactly do you put it all in? I searched and searched and never found anything that helped .. just diagrams like that posted above but it never made sense until I asked people I knew. With that I have used these diagrams to illustrate step by step how to install a single disc clutch in our V160's.
You can also go with aftermarket clutch kits (pressure plate, clutch disc and sometimes a throwout bearing with other rings). I have heard great things about South Bend Clutches for the street cars, RPS carbon/carbon or RPS triple carbon clutch for racing and then the Tilton multi-disc clutch as well. I have heard some horrible things and saw some pictures about the RPS carbon/carbon clutches such as the discs breaking and pretty much severing the transmission in half and almost someones leg. That could have just been a single faulty disc, but do some research before pulling the trigger on a certain clutch.
I am aware that there are two different methods of installing the clutch. One is easy and the other makes things difficult. Ill start with the easy method. This involves us having the trans out/off the engine and using a clutch alignment tool to bolt things up and then slide the trans on.
Torque specs:
- Flywheel to Crank: Tighten to 36 ftlb in a crossover pattern, then tighten each bolt another 90 degrees again in pattern. If you are doing this with an aluminum flywheel, make three passes at 36 ftlb before the 90 degree tighten, the aluminum will compress a little
- Pressure plate to flywheel:12mm head bolts 19 ftlb ( a little over 20 wont hurt, you DONT want these to come out)
- Transmission to engine: 17mm head bolts, 53 ftlb; 14 mm head bolt, 29 ftlb.
- Starter terminal: 48 inlb (Notice the units!)
- Starter bolts: 14mm head bolts 29 ftlbs
- Release Cylinder: 12mm head bolts, 9 ftlbs
- Clutch housing covers: 9 ftlbs
- Center support bearing mounts: 36 ftlb
- Intermediate shaft to transmission bolts: 17mm head bolts, 41 ftlb
- Rear transmission mount inside bolts: 12mm head bolts, 10 ftlb
- Rear transmission mount outside bolts: 14mm head bolts,19 ftlb
- Shifter pivot bolt: 12mm head bolts 14 ftlb
- Shifter plate bolts: 10mm head bolts, 69 inlb
- Crossmember bolts: 12mm head bolts, 9 ftlb
- Trans. Oil Drain Plug: 17mm head bolt, 29 ftlb
The trans is out of the car wth the slave cylinder off the trans.
Lets get started:
- Install your pilot bearing
- . I used a 15/16 socket to hit it in with a hammer. Add grease to the center and the nipple on the end of the shaft of the trans.
- Now you have to bolt the flywheel to the engine. (if its not already)
- Attach the throwout bearing to the pressure plate with the plate washer, wave washer and snap ring.
- Slide the Clutch Thrust Cone Washer and Plate Washer onto the clutch hub
- Slide the hub thru the Throw out bearing that is already attached to the pressure plate.
- and secure with the snap ring.
- Using a clutch alignment tool #70(14 spline/tooth), align the clutch disc and the pressure plate onto the flywheel. NOTE: "On all aftermarket disks, the cone section faces the rear of the car. This is opposite of the stock disk shown in the picture."
- Now secure the pressure plate to the flywheel and remove the clutch alignment tool..
- After all bolts are torque'd to specs you are ready to install the trans.
- Slide the trans onto the engine and bolt the trans to the engine. ( Do not pull the trans to the motor by tightening the bolts. The trans SHOULD slide into place with little help.) ** DO NOT FORCE IT ON **
- After it is on make sure the fork goes around the hub and snaps into place.
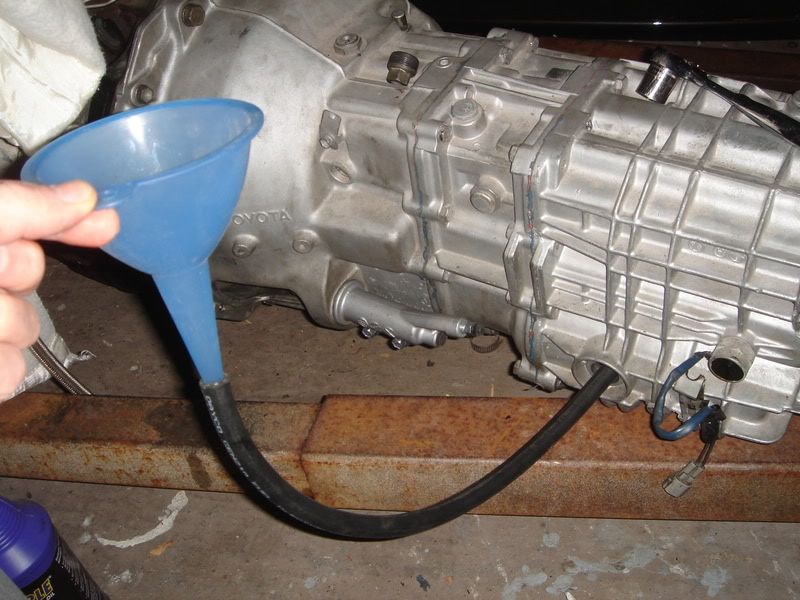
- If engine is out of car you can now fill the trans with fluid before dropping the engine and trans in together. Either way I would add the 1.8L of fluid into the trans before it goes back in/on the car.
The hard way would be to:
- Put the pressure plate along with the hub, throwout bearing, with all clips into the trans and connecting it to the fork.
- Slide the Pressure plate into the trans and attach the fork to its hook inside the trans.
- Once secure, you can now slide on the clutch disc. NOTE: "On all aftermarket disks, the cone section faces the rear of the car. This is opposite of the stock disk shown in the picture."
- Than secure the trans onto the engine
- Continue by bolting down each individual bolt from the pressure plate to the flywheel one at a time (6 total)
- After each one you need to spin the flywheel in order to get to the next bolt.
- Its take a little more tme and is a tight working space, but can be done and no need to buy a clutch alignment tool #70.
NOTES:
- if you bought a used flywheel, get it resurfaced. It may chatter after install.
- Assuming you bought a new clutch kit (pressure plate, clutch disc, T/O bearing & Pilot bearing), clean the clutch disc with brake cleaner to remove the chemicals they put on the disc to prevent it from rusting while it sits on the shelves waiting to go to the customer.
- Replace your throwout bearing and pilot bearing during any clutch install. NEW PARTS ARE ALWAYS BETTER!!
- If you replace the pressure plate with a new one, replace the snap ring at the end of the hub thats holding the throwout bearing on. Again, new parts are better.
- "On all aftermarket disks, the cone section faces the rear of the car. This is opposite of the stock disk shown in the picture."

|
1997 Clutch & V160.pdf Size : 1.05 Kb Type : pdf |