Removal of Radio/Headunit
- Begin by removing the center console/shifter plastic piece
- Next unscrew and remove the plastic piece that hold the odometer and warning lights
- Now remove the rings that snap into the speedometer/tachometer
- Unscrew and unsnap the plastic that covers the radio area
- Unscrew the 4 screws holding in the radio and unclip the harnesses & antenna behind the radio
When switching out the OEM Radio with an aftermarket one there are a few things to know.
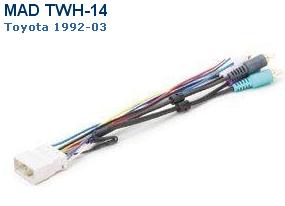
First is to make sure you purchase the proper harness like the one to the right here. (Model # MAD TWH-14 . for ~ $5.95+ ship)
It is highly recommended, by other Supra owners who have tried different harnesses, to NOT use the Metra harness.
"Here are some of the problems with it.
1) The remote ON & Power antenna wires are jumpered together,
.... A) your antenna will always be up when radio is on..
.... B) Amp & antenna share power source (blue wire) & will
have static & popping noise. & WILL damage one or both,
disconnect it NOW ...
2) Metra harness does not have all wires necessary. Here are the 2 main ones missing ..
.... A) No blue with white strip wire for amp remote on..
.... B) No orange with black strip dimmer/light controll.
3) The pre-amp audio outputs (RCA jacks) are wired wrong on the Metra Harness ..
.... A) RCA pre-amp outputs share the same negative (-) connection, for all 4 speakers ..
I bought the Metra Harness first , and because of the way it was
configured I did not use it ,, instead I ordered the TWH-14 harness ..
with both harnesses in hand, the differences were obvious .." -HXG94TT
The harness SHOULD come with a diagram for the particular make of the car. It will tell you what each wire does (by color) and that corresponds to the same wire that will be connected to on your AFTERMARKET Radio. Your aftermarket radio should have its own wiring diagram as well. You would then match
If
you need wiring for your stock Amplifiers I have put them in here as
well. If you have a stock amplifier (under passenger seat) click
Amplified. If not than click NON Amplified. With the proper harness,
this is not needed.
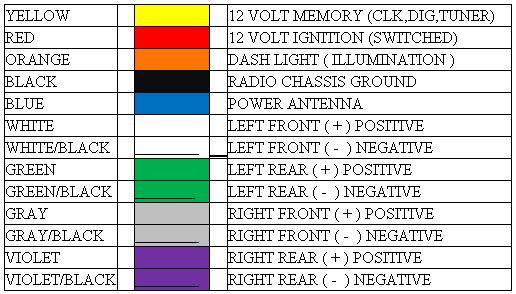
AFTERMARKET RADIO HARNESS COLOR CODES
| P o w e r | |
|---|---|
| Memory (+12v Constant) | Orange |
| Ignition (+12v Switched) | Red |
| Ground (-) | Black |
| Illumination | Yellow |
| Phone Mute | Yellow/Black |
| Power Antenna | Blue |
| S p e a k e r s | |
| Right Front (+) | Gray |
| Right Front (-) | Gray/Black |
| Left Front (+) | Green |
| Left Front (-) | Green/Black |
| Right Rear (+) | Gray/Red |
| Right Rear (-) | Black/Gray |
| Left Rear (+) | Green/Red |
| Left Rear (-) | Black/Green |
Sony, Alpine, Pioneer (1999 and up), Eclipse, Kenwood, JVC, etc
| P o w e r | |
|---|---|
| Memory (+12v Constant) | Yellow |
| Ignition (+12v Switched) | Red |
| Ground (-) | Black |
| Dimmer | Pink/White (Alpine only) |
| Power Antenna | Blue |
| Amplifier Turn-on | Blue/White |
| Phone Mute | Light Blue (Sony only) |
| S p e a k e r s | |
| Right Front (+) | Gray |
| Right Front (-) | Gray/Black |
| Left Front (+) | White |
| Left Front (-) | White/Black |
| Right Rear (+) | Violet |
| Right Rear (-) | Violet/Black |
| Left Rear (+) | Green |
| Left Rear (-) | Green/Black |
There might be different colors in your
harness since radios vary from model to model. If you are not sure about color
codes, contact your nearest dealer or manufacturer. Fortunately, most manufacturer's
are trying to use the same wire codes. With minor variations, the second table
applies to most aftermarket head units. The first table covers older Pioneer radios
(up to 1998). (information found from here)
OTHER MODIFICATIONS
3.5mm input jack to stock amplifier
"I decided to remove the headunit from my car so I could use the space
for adding gauges. But I still wanted to be able to listen to music.
Since I already had a pre-amp adapter harness I decided to try
connecting a 3.5mm stereo headphone jack on the pre-amp lines. So far
with all the devices I've tried (iPod, cell phone, portable MP3 player)
their built-in volume control was more than capable of varying the
level from quiet to loud/distortion. Since a few have asked about it I
thought I'd add a short how-to thread.
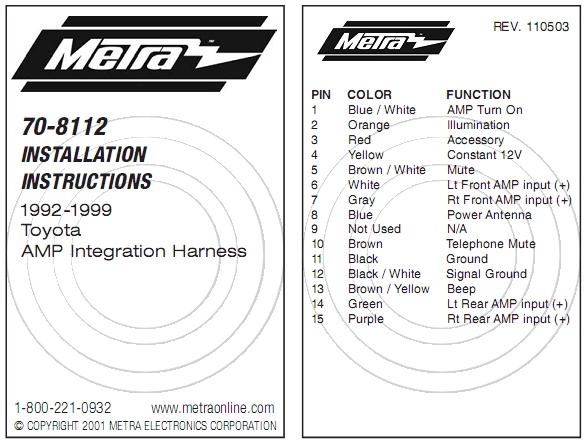
First, I started with the Metra 70-8112 adapter harness. This plugs in
to the stock stereo harness and provides the wiring to connect an
aftermarket headunit using pre-amp outputs. This maintains the OEM
amplifier. The wiring pinouts for this are shown below:
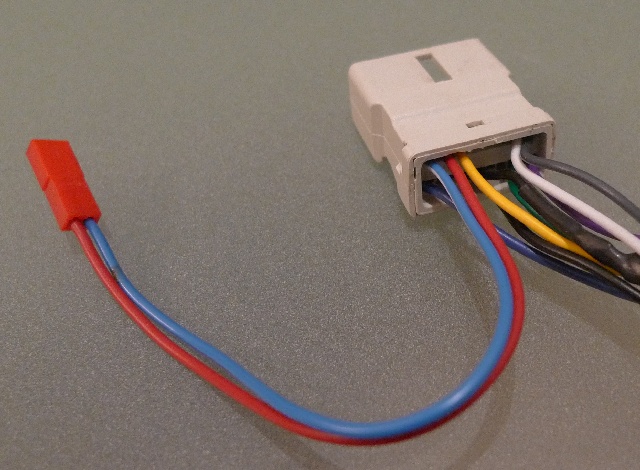
You need to add a way to turn the amplifier on and off. Do this by
creating a switch between the blue/white (amp turn-on) and red (+12V
with key on) wires. I added a small connector to make removal simpler
when I pull the dash panel off. This is shown in the image below:
For a quick test I used adapters (from Radio Shack...I know...chinsy).
You'll need two (2) of the 2 Female RCA in, 1 Male RCA out, and one
stereo Female RCA to Female 3.5mm phono cables. This is wired such that
the front and rear right channels are joined together, and same for the
left channels. This is shown in the image below:
Turn the system on by closing the switch, and use a 3.5mm stereo phono
cable to the headphone output of your favorite device. If I like this
I'm sure I will get rid of all the RCA connectors and solder the wires
from the phono cable directly to the Metra harness. But for now this is
very reversible in case I want to install a headunit in the future. " -Dan
(Cord4530)
Radio Double DIN Blanking Plate
This would be used to remove the radio completely and in conjunction with the input jack to stock amplifier mod.
Here are some ways to make a blank plate.
"i personally made an aluminum plate for my radio panel, i cut it a
little large, ie. about 1/16" inch larger, and dremeled it down slowly
for the perfect fit and then when i slid it in, it fit tight. then i
used a bonding glue to ensure that it wouldnt ever push out."